SSO Configuration with SAML (Single Sing-On)
1 – In Google Workspace, go to Apps > Web and mobile apps
2 – Select Add app > Add custom SAML app
3 – Fill in the following data:
- App name: OnePlatform (Suggested name)
- Description: (Optional)
- App Icon: (Optional) OnePlatform Icon
Click CONTINUE
4 – Copy the Entity ID and download the Certificate. Click CONTINUE
5 – Open OnePlatform in a new tab, click on Settings Organization
6 – Select the Single Sign-On tab
7 – Fill in the Sign In URL field with the Entity ID copied in step “4” and select the downloaded Certificate file
- ACS URL
- Entity ID
9 – Paste the copied data into the corresponding fields in Workspace, as shown in the image below.
10 – Choose the format you want for the app name (First name, Last name or Primary e-mail) and click CONTINUE
11 – Open the created app and click on User Access
12 – Enable access for Workspace users to use this app. Users who are enabled will be able to log in to OnePlatform
- If you to release it to all workspace users, select ON for everyone and click in SAVE
- If you want, configure a specific group in your workspace and, by clicking on Group, select the desired group, then activate the ON switch and click on SAVE
13 – Wait until the App created to access OnePlatform appears. This may take a few minutes
Configuration for user synchronization on OnePlatform
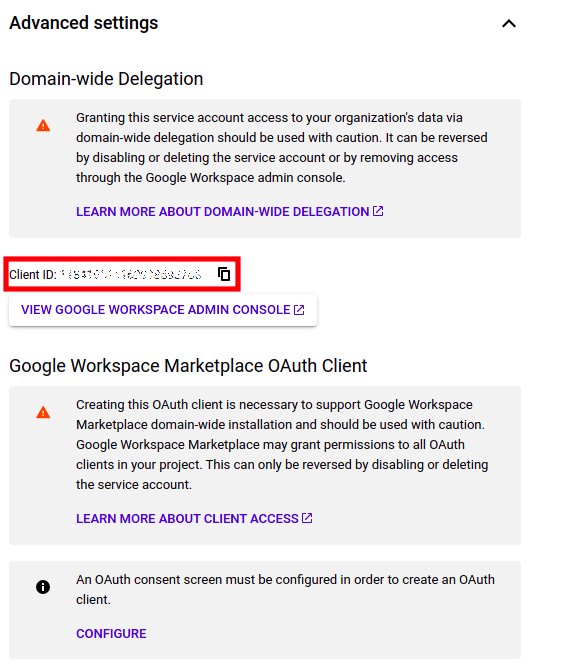
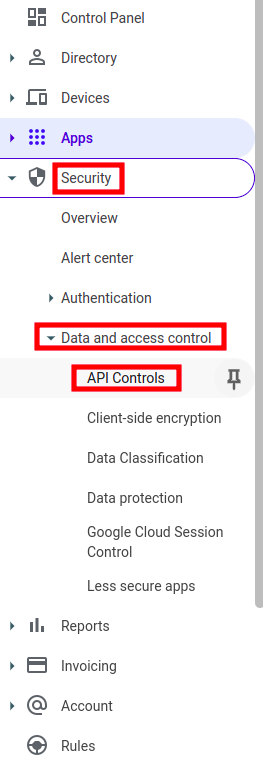
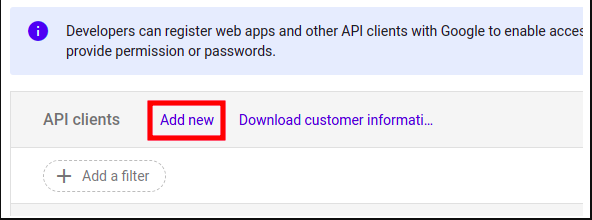
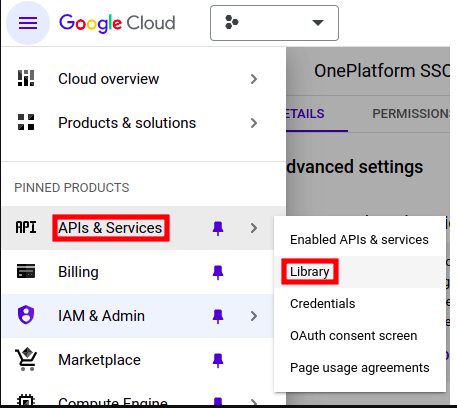
1 – Enter the Google Cloud, select the menu through the 3 bars located in the top left corner, select IAM & Admin > Service Accounts
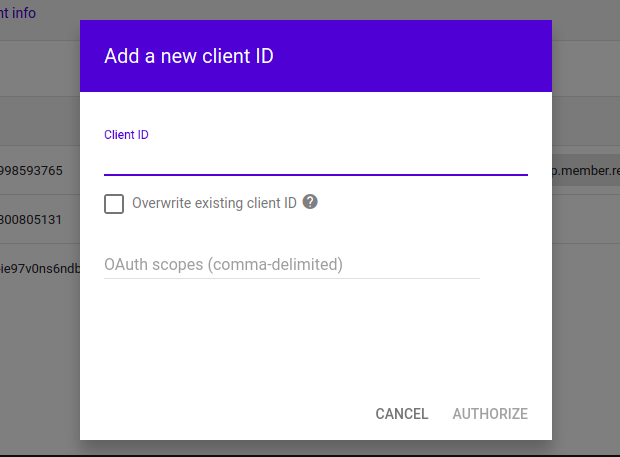
2 – Click Create Service Account
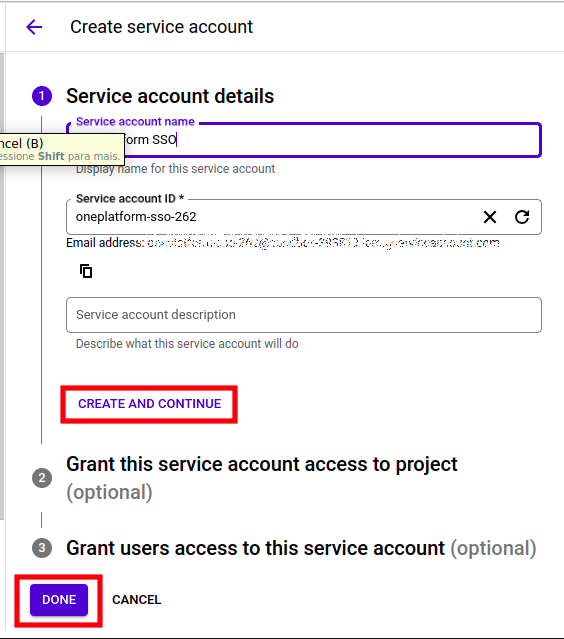
3 – Fill the fields with the data, click on Create and Continue then on Done
- Service Account Name: Oneplatform SSO (Suggested name)
- Description: (Optional)
![](https://elven.works/wp-content/uploads/2024/04/Captura-de-tela-de-2024-05-15-16-17-28.png)
4 – Open the created service account and select the KEYS, click ADD KEY and Create new key
![](https://elven.works/wp-content/uploads/2024/04/Captura-de-tela-de-2024-05-15-16-21-10.png)
5 – Select the key type as JSON, click CREATE.
***store in a safe place
![](https://elven.works/wp-content/uploads/2024/04/Captura-de-tela-de-2024-05-15-16-21-58.png)
6 – Select the Details tab and click on Advaced settings
![](https://elven.works/wp-content/uploads/2024/04/Captura-de-tela-de-2024-05-15-16-22-48.png)
7 – Write down the Client ID, as it will be used in future steps
![](https://elven.works/wp-content/uploads/2024/04/Captura-de-tela-de-2024-05-15-16-23-28.png)
8 – In your Workspace Administrator panel, in the lefr menu, select Security> Data and access control > API Controls
![](https://elven.works/wp-content/uploads/2024/04/Captura-de-tela-de-2024-05-15-16-25-53.png)
9 – Click on MANAGE DOMAIN WIDE DELEGATION
![](https://elven.works/wp-content/uploads/2024/04/Captura-de-tela-de-2024-05-15-16-26-46-1024x153.png)
10 – Click on Add new
![](https://elven.works/wp-content/uploads/2024/04/Captura-de-tela-de-2024-05-15-16-28-36.png)
11 – In the Client ID field, fill in the valuue noted in step “7”
![](https://elven.works/wp-content/uploads/2024/04/Captura-de-tela-de-2024-05-15-16-30-37.png)
12 – In the OAuth scopes
field, fill in these values on each line (place each link separately,
for each one added, the field to add the next one will appear):
- https://www.googleapis.com/auth/admin.directory.group.readonly -> View groups on your domain
- https://www.googleapis.com/auth/admin.directory.group.member.readonly –> View group subscriptions on your domain
- https://www.googleapis.com/auth/admin.directory.user.readonly –> View information about users in your domain
***If you want to check the level of access you are allowing, access the link
13 – Click on AUTHORIZE
14 – Access the Google Cloud Console, in the left menu, access APIs & Sesvices > Library
![](https://elven.works/wp-content/uploads/2024/04/Captura-de-tela-de-2024-05-15-16-31-21.png)
15 – Search for Admin SDK API
![](https://elven.works/wp-content/uploads/2024/04/Captura-de-tela-de-2024-05-15-16-32-41-1024x311.png)
16 – Click on Enable
![](https://elven.works/wp-content/uploads/2024/04/Captura-de-tela-de-2024-05-15-16-33-44.png)
17 – Return to the SSO settings screen on OnePlatform and fill in the fields:
- Workspace admin e-mail -> email with admin access to the workspace
- E-mail of group to sync users ->
e-mail of the group configured to synchronize users with OnePlatform
(if you selected activate for the entire workspace, use a group that
contains all users)
![](https://elven.works/wp-content/uploads/2024/04/Captura-de-tela-de-2024-05-15-16-34-30-1024x242.png)
18 – Further down in Credentials File, select the JSON saved with the keys created in step “5”, clicking on SELECT FILE
![](https://elven.works/wp-content/uploads/2024/04/Captura-de-tela-de-2024-05-15-16-35-09.png)
19 – Click on SAVE INTEGRATION and it is configured.